


In an ideal world, the safety and efficacy of all of the fabrics and materials used in handmade masks for COVID-19 would be tested using the same standards and facilities used by researchers and large manufacturers. Unfortunately, very few people have access to these resources. In this post we provide instructions for three easy DIY mask tests to evaluate key features of masks materials and fabrics that can be done at home.


Note: Boxes with additional content, tests, and information are located throughout this document. click on the “+” to expand the box for the bonus materials. Once expanded the content can be contracted by clicking on the “-“.
Materials and Supplies for DIY Mask Tests
The items listed below will be needed for each of the DIY mask tests. Additional items required for a specific test will be included in each test section. You may reuse the same supplies to conduct all of your tests, or use a fresh set for each test.
For a deeper dive into the science behind mask materials and the importance of each test, read more at: The Big 4: Criteria For Community Mask Materials.
Materials/Fabrics to Test:
- Cut a 4” (10 cm) square of each material/fabric for testing.
- Paper towel
- Woven cotton fabric
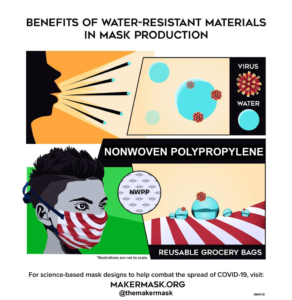
- Spunbond nonwoven polypropylene (NWPP) fabric
- Plastic wrap
Other Supplies:
- Scissors
- A kitchen scale (measures grams)
- A glass or jar
- Clock, timer, or stopwatch
- Elastic or rubber bands
- 4 – Cardboard tubes (e.g. from toilet paper rolls)
- Yard stick or tape measure
- Pea-sized lint ball or cotton ball
- A notepad or table to record your results
1. DIY Mask Tests: Water Resistance

Objective
Use this test to determine how well a material can keep water from crossing from one side of the mask/material to the other.
Materials and Supplies:
- Materials/fabrics for testing
- Glass or jar
- Elastic bands
- A coin (e.g., a quarter)
- Measuring cup and cold water
- Timer
- Graduated medicine cup
- alternatives: syringe, pipette, or teaspoon
Procedure:
- Set out the four materials for testing, the elastic bands, and an empty glass.
- Fill a measuring cup with cold temperature water and bring it back to your workspace.
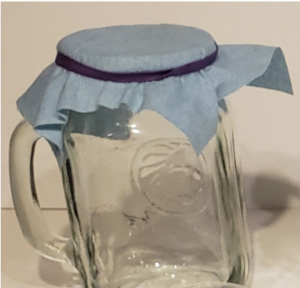
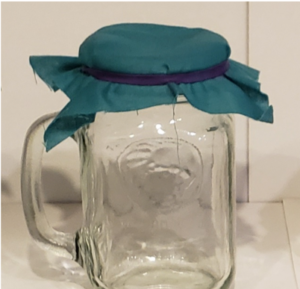
- Take one of the squares of material, place it over the mouth of the empty glass, and then place the elastic band around the rim of the glass to hold the material in place. (Note: a coin, e.g., a quarter, can be used to create a small dimple in the center of the mask material)
- Measure 10 ml or 2 (US) teaspoons of water, and pour it onto the material covering the glass.
-
Set a timer for 60 seconds after pouring the water on top of the material.
-
Wait for 60 seconds to elapse then, if there is any water on top of the material (i.e. outside the cup) pour it into the graduated medicine cup and record the measurement in your results table (“Repelled Amount”).
-
Carefully remove the material from the mouth of the glass and set to one side.
-
Pour any water inside the glass into an empty graduated medicine cup and record the measurement in your results table (“Collected Amount”).
- Calculate the amount of water absorbed by the material and enter the value into your results table (“Absorbed Amount”):
- “Absorbed Amount” = “Starting Amount” – “Repelled Amount” – “Collected Amount”
-
Dry off the inside of the glass and the medicine cup, and repeat the process for each material you want to test.


2. DIY Mask Tests: Breathability


Objective
Use this test to determine which material has the breathability of mask materials by measuring how far you can blow a small object (high breathability = longest distances).
Materials and Supplies:
- Masking tape
- Test Materials
- Elastic or rubber bands
- 4 – Cardboard tubes (e.g. from toilet paper rolls)
- Yard stick, ruler or tape measure
- Pea-sized lint ball or cotton ball
Procedure:
- Clear a space on a large flat surface, place a strip of masking or painter’s tape on the surface (at least 1” or 2.5 cm from an edge) and then set your yardstick (or other measuring device) next to it so that the zero-marker is aligned with the far edge of the tape.
- Wrap each square of material over one end of a cardboard tube (four tubes in total), and secure it with an elastic band.
- Find a ball of lint, or cotton ball and roll a piece of it into a ball that is about the size of a pea.
- Place the cotton or lint ball on the far edge of the tape. This position is the ‘zero-marker’ and should correspond to zero on your measurement device (see illustrations below).
- Place the end of the cardboard tube wrapped with your material at the other edge of the tape (the near side of the tape).
- Blow through the tube using one normal breath. When finished,
- Measure the distance the ball rolled.
- Record this distance in your results table.
- Replace the ball at the zero-marker and repeat for each material until all materials have been tested.


3. DIY Mask Test: Filtration


Objective
Use this test to determine how well a material can keep particles (< 50 μm) from crossing from one side of the mask/material to the other.
Materials and Supplies:
- Choose a powder with small particle size (e.g., baking powder)
- A magnifying glass (optional)
- A measuring teaspoon
- A bowl or pan or a couple pieces of dark-colored paper
Procedure:
- Reuse the same cardboard tubes wrapped in material from the “Breathability Test”
- Setup your test area with a bowl to contain any potential mess, a measuring teaspoon, and some of your powder.
- Hold the first cardboard tube covered with material over the top of the bowl, so that the end with the material is facing downwards.
- Scoop one teaspoon of powder into the open end of the cardboard tube.
-
Using a timer, shake the tube of powder for 30 seconds above the bowl.
- Make note of whether you observed any powder accumulating in the bowl.
- If powder is obviously cascading through the material, the material has poor filtration characteristics.
- If a measurable amount of powder accumulates, measure it.
-
Dump the powder remaining in your tube into an empty bowl. Then place the cardboard tube with the material facing upwards on a flat surface. Observe whether or not particles of the powder passed from the inside of the tube to the outside surface of the material. Write down your observations. (A magnifying glass may be used to aid observations if needed).
- Repeat for each material.
-
Once you have completed the test with each tube and material, observe how much powder has passed through each material and record a rank for each material in your results table.


In the video below, you will see that the setup on the left (spunbond NWPP) has high particle filtration. The powder remains in the tube and the glass below remains clear and clean. In contrast, the setup on the right, with low particle filtration, passes a large quantity of powder through the material (cotton) into the glass below, and the material itself is covered in powder during and after the test.

Conclusion
- Water-Resistance: According to the WHO, water-resistant (hydrophobic) materials should be used for the outermost layers of the mask, hydrophilic layers should be used for the innermost layer.
- Breathability: If a mask is not breathable, it should NEVER be used. Although breathability of each individual material is important, it is also important to verify that the combination of desired materials is breathable as well.
- Filtration: Particle filtration is what helps block droplets and particles from traveling through your mask. In addition to evaluating individual layer performance, be sure to evaluate the performance of your multi-layered designs.

Additional DIY Mask Tests Under Consideration
Mask materials/fabrics should be cleaned according to manufacturer’s guidelines. If manufacturer’s guidelines are not available test a set of samples of mask materials/fabrics using the methods proposed for cleaning/disinfecting the mask. All mask materials should be able to withstand high temperature > 60°C washing through multiple cycles according to the WHO guidance. For MakerMask designs, disinfection by boiling or steaming is recommended (For more information about cleaning and disinfection see: Fabric Face Masks: Cleaning and Disinfection.)
Method: As a simple test of mask material suitability for boiling/disinfection:
- Cut out five or ten squares (5 cm x 5 cm) of each material to be tested.
- Then either boil (submerge in boiling water for 10 minutes) or steam (at 15 psi, 121°C for 15 minutes) the material. For more information on these disinfection procedures and a deeper dive into the science behind them check out: The Deeper Dive on Fabric Mask Cleaning and Disinfection
- After treating, measure the dimensions of each square and note any obvious changes in material properties.
- (Ideal) Repeat the 3 DIY tests of the materials before and after cleaning/disinfection.


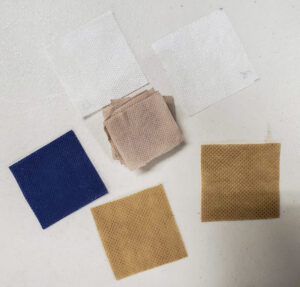
Results: We evaluated 4 material types, three 40 gsm bandage materials donated from Hollister (a,b,c), and one 90 gsm material sourced from a reusable conference bag (d).
- a) 40 gsm translucent white spunbond NWPP
- b) 40 gsm tan spunbond NWPP
- c) 40 gsm beige spunbond polyethylene
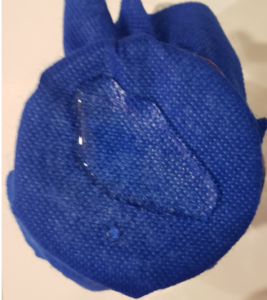
- d) 90 gsm navy blue spunbond NWPP from reusable bag.
After one 15-minute steam disinfection cycle (e.g., Instapot), all ten samples of polyethylene (c) decreased in size from 5 x 5 cm to 3.5 x 3.5 cm. However all 40 samples of spunbond polypropylene remained the same size over the course of five disinfection cycles. Caution: Significant off-gassing/odor resulted from steaming the polyethylene. Do not steam polyethylene. In general, if off-gassing is a concern, use the lowest effective temperature disinfection/sterilization methods. Recall, longer durations of heat exposure are required at lower temperatures.

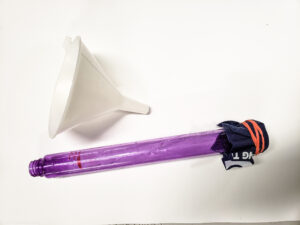
Recommended as a pre-test for fluid resistance (ASTM F1862) for proposed surgical masks. This is a home DIY version of one of the water resistance test used to assess the water penetration resistance of surgical drapes and gowns.
Materials: clear rigid tube (or other clear vessel with open top and bottom), sharpie, ruler, razor blade, elastic bands, mask materials, funnel, cold water, glue gun (optional). The clear tube should be at least 20 cm tall. For the DIY test, the open-ended tube was crated by using a razor blade to cut off the bottom of a ‘bubble stick’ tube. A glue gun was used to coat the bottom of the tube to close gaps and create a smooth mounting surface for mask materials at the bottom of the tube. Then, the ruler was used to measure 10 cm and 20 cm up the tube.
Procedure: Materials were affixed to the bottom and water was poured through the funnel into the tube up until the point that water began dripping through the material at the bottom. The height of the water column was then recorded in cm H20 to indicate the pressure at which water penetrated through the mask materials.
Example Results: Three layers of 100 gsm spunbond NWPP was able to support > 20 cm H20, whereas 3 layers of 80 gsm spunbond was able to support < 15 cm H20.

Although quantitative DIY mask tests of breathability and CO2 accumulation are challenging in home settings, a simple DIY test monitoring the functional breathability of your mask may be possible at home by monitoring blood oxygenation saturation levels (O2 sats) using a pulse oximeter. Conveniently, pulse oximeters for home use are widely available online for ($20 – $50). By monitoring your heart rate and 02 sats before, during, and after mask use of specified duration and/or activities you may be able to gain insight on the breathability of your mask. Ideally, both your heart rate and O2 sats will be the same with and without the mask during a given activity. If the mask is negatively affecting functional breathability, I would expect to see decreased O2 sats and/or elevated heart rates relative to unmasked conditions.
Note: This test is to satisfy your own curiosity and in no way is an endorsement of, or instruction for, clinical or human testing. Human testing requires special considerations of CONSENT and PRIVACY and RISK and ETHICS and cannot be recommended or endorsed by the MakerMask team. Insert ALL disclaimers here.


Additional Information and References
Kitchen particles are passed through sieves (meshes) to ensure that the particles, or grains, of the dry materials all fall below specified maximum sizes. The distribution of particles sizes is typically centered well below the maximum mesh size used to filter them.


References:
- Corn starch:
- Flour: https://bakerpedia.com/processes/particle-size/
- Baking powder: a combination of corn starch and baking soda in most cases
- Baking Soda:
- Sugar: https://www.sympatec.com/en/applications/sugar/


