


Printable Sewing Instructions (4 Pages)
Paper Folding Instructions & Pattern (2 Pages)
Instructions with Schematics (10 Pages)
Photo Tutorial (16 pages)
The “MakerMask: Origami (Beta)” is designed as a stand-alone fitted mask with a number of features to improve accessibility. This mask is constructed without any seams in the central mask area and creates a 3-D shape around the face that gives extra space around the mouth and nose.
Mask Features:
- Single latex-free silicone headband improves fit and accessibility
- Large breathable surface area!
- Compatible with Hearing Aids and Ear Buds
- Washable
- Available in multiple sizes
- Construction Time: 10 – 20 minutes
Technique:
This mask is a sewn mask constructed from a square of fabric material (two or three layers) which is transformed into a 3-dimensional fitted mask by a series of pleats and origami folds. These folds are stitched into place, creating a padded trim around the circumference of the mask, which both improves the seal to the face and increases the comfort of the mask. Before you get started, consider practicing the origami folding with a piece of paper.
- Click here for a Paper Folding Instructions and Pattern o Click here for a video of the paper folding
Origami Mask Instructions (Beta Version 0.2)
Materials & Equipment |
||
Materiales
Equipment:
|
 |
|
Sew Layers Together |
||
Step 1: Sew Layers TogetherA. Place all of the layers of fabric directly on top of each other, with the edges aligned.B. Sew the layers together along each of the 4 sides leaving a 2” section unsewn ( ¼” seam allowances used throughout).C. Trim excess fabric, especially at the corners and then turn the square inside out through the 2” unsewn section. |
 |
|
Add Nose Piece & Attachment Loops |
||
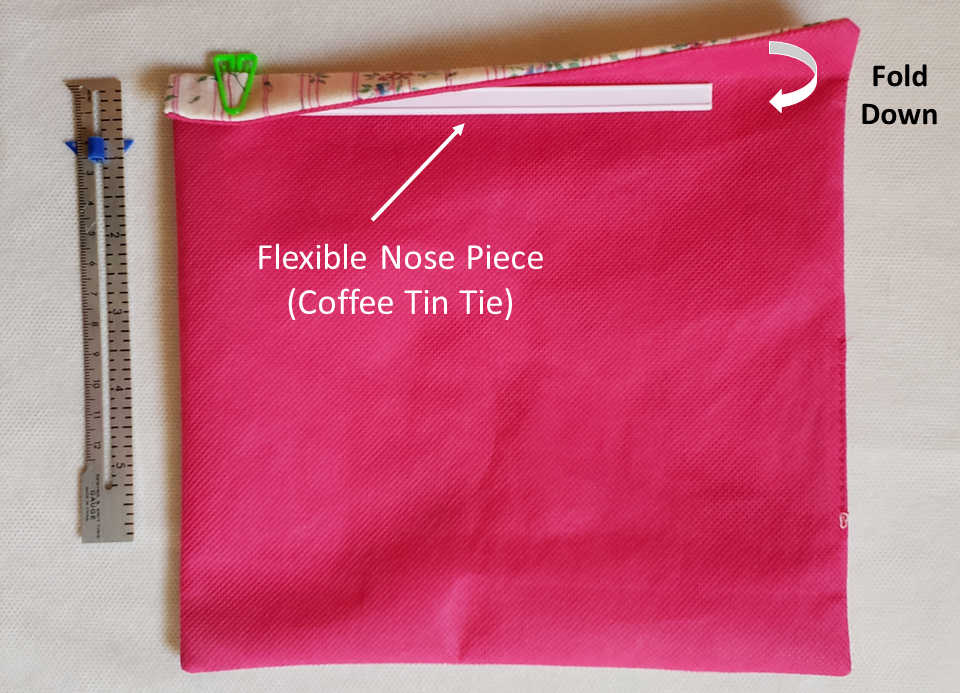
Step 2: Add Flexible Nose PieceA. Turn Down the top ¾” of fabric.B. Place the flexible nose bridge under the nose flap, so that it is centered around the mid-line of the mask. |
 |
|
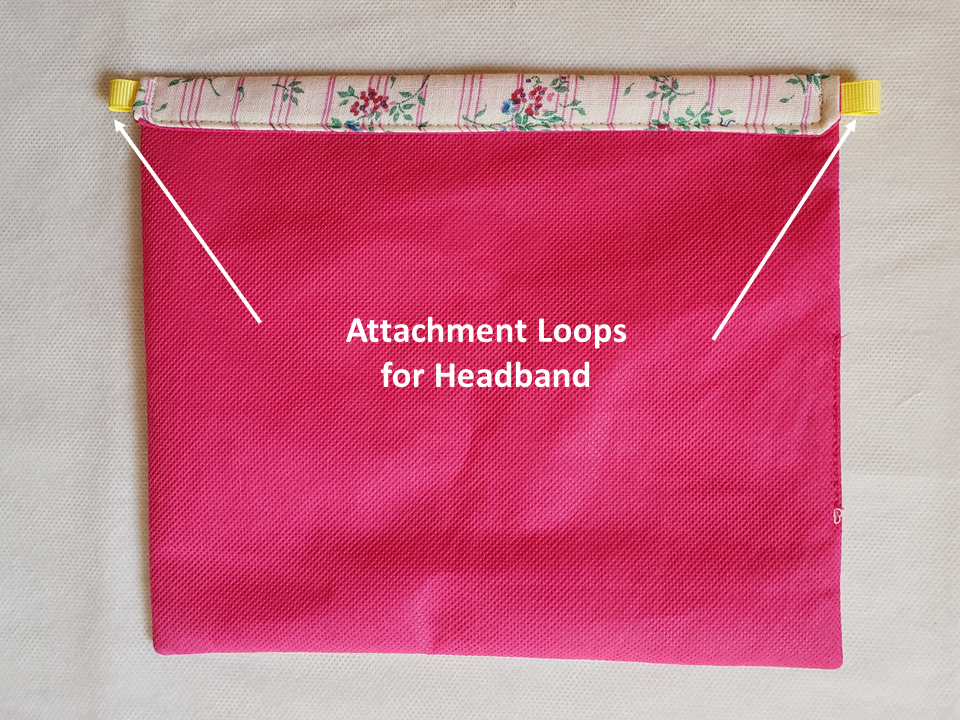
Step 3: Add Attachment Loops and Sew The Fold DownA. Tuck attachment loops under fold.B. Sew the fold down, securing the nose piece and attachment loops in place. (For added durability reinforce the stitching on the loops using a “box X” stitch or similar) |
 |
|
Add Pleats |
||
Step 4: Add Two “Waterfall Pleats”A. Add two pleats, each ¾” wide and ¾” deepMeasure ¾” down from the bottom of the fold for the nose piece. To create a pleat ¾” deep, the fabric should be folded so this point is held to the point 1 ½” down. Repeat for the second ¾” pleat.B. Use clips (or basting stitches) to hold pleats in place |
 |
|
Add Origami Folds (see video for details) |
||
Step 5: Fold The Bottom 2 ½” UnderA. Fold the bottom 2 ½” under (to the back)B. Turn the mask over |
 |
|
Step 6: Fold ¾” DownA. Fold ¾” of the back down to create “trim”. |
 |
|
Step 7: Create 3D Mask ShapeA. Fold the bottom corner of one of the sides up to create a right triangle that intersects with the top edge of the “trim”.B. Tuck the top edge of the triangle (step 7A) under the ¾” flap created in step 6A. Hold the flap in place over the triangle with a clip (yellow in photo).C. Repeat for the other side. |
 |
|
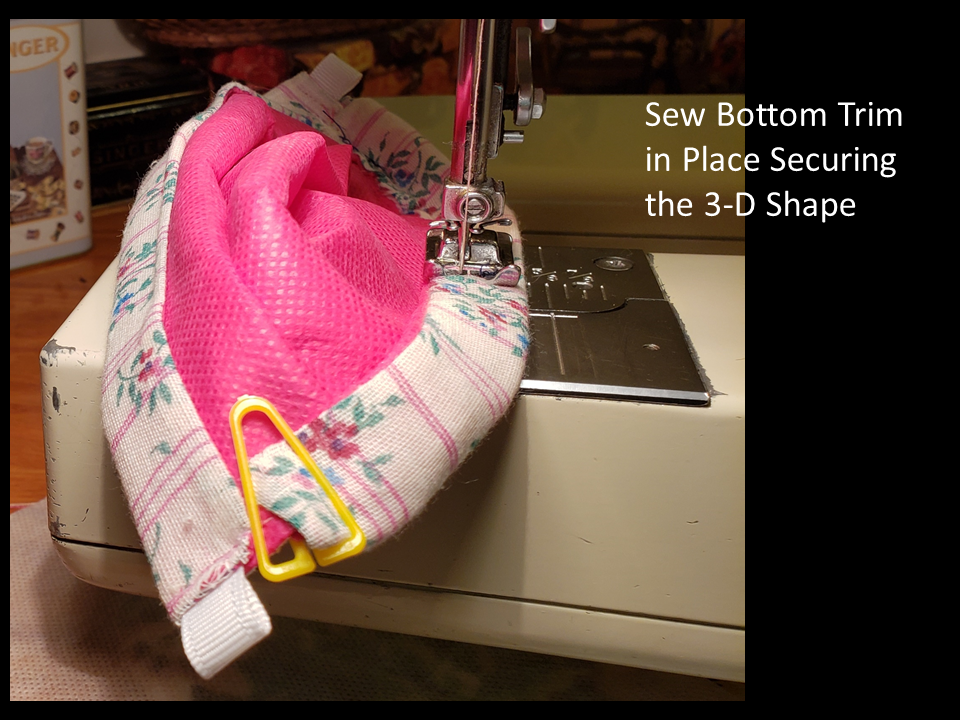
Step 8: Sew The Final SeamA. Expand mask into 3D shape.B. Sew the “trim” in place, securing the trim and all the pleats in place. This trim will create the seal to the face along the cheeks and chin line. Extend the stitch line over the the attachment loops to reinforce the stitching |
 |
|
Attach Headband |
||
Step 9: Attach HeadbandA. Thread silicone band through the attachment loops, adjust to desired length (~18 inches) and tie knots in the ends to hold in place.To ensure that the band is held securely into place, loop the band through the attachment loop before tying (see photos). |
 |
|
Step 10: Expand Pleats and Enjoy the MakerMask: Origami! |
 |
|
Quick Reference Guides for 3 Different Origami Mask Sizes
Click the individual images below to enlarge them or click here to download the pdf.


Additional Pattern Variations
Click on the gray boxes below for additional information about pattern variations for this origami mask.

For Extra Large Mask: Start with a 10″ x 10″ square and use 3/4″ pleats. This variant is popular with people with beards. For Small/Kids Mask: Start with an 8” x 8” square. Use ½” pleats instead of ¾” pleats. NOTE: Coffee tin nose ties may be too large/stiff for children’s mask. See notes in the cheat sheet for the “Extra Small” for improving fit to the face in absence of nose bridge. For “extra small” smaller masks consider starting with a 7” x 7” square and two layers of lighter weight material. Size Adjustments: The length of the silicone ties can also be shifted to improve the fit. To create a roomier mask and/or to decrease the number of layers to sew through for thicker materials, consider using one pleat instead of two (Step 3); otherwise follow directions as written. The size of the mask can also be adjusted by using ½” pleats instead of ¾” pleats or changing the fold at Step 4 from folding 2 ½” back to folding 2 ¼” or 2” back instead. Other folding variations include changing the depth and angle of the pouch-like breathing area by changing the amount of material folded over in Step 4, and altering the angles of the folds (steps 4 and 5).

Ear Loop Adaptation
The MakerMask: Origami can be adapted for use with ear loops (in cases where headbands/straps are not appropriate) by adding a second pair of attachment loops to the mask. These attachment loops should be located on the trim of the mask below the bulk of the second pleat (approximately 2.5″ below the top set of attachment loops). The preferred ear loops configuration includes an embedded lanyard, which allows the ear loop tension and fit to be adjusted with a single cinching element either behind the head, or under the chin. The preferred material for the ear loops/lanyard is a single strip of T-Shirt material (100% cotton jersey knit). See ‘cheat sheet’ below for details.
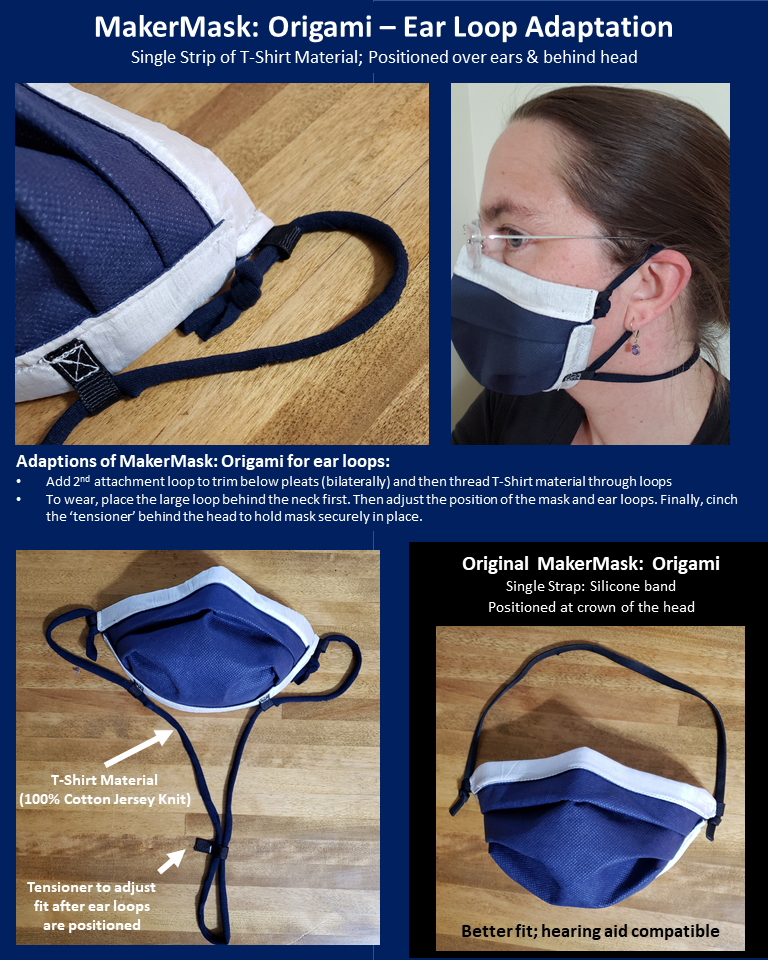
— The video below shows the fit of the mask, as well as doffing the mask with one hand without touching the central mask area (Note, there is no audio associated with this video). —